
Project Flashpoint
Drone footage generator app
Bricksol was approached by a client who required drone footage generation on the web for their customers. The requirements were:
- The customer would enter co-ordinates and a logo
- The customer receives footage of a drone flying on that location, focusing on a specific object, complete with Preroll and Postroll
But first, a demo
The following video was fully generated in Unreal Engine:
Solution
The video consists of three separate parts, each its own concern.
1. The intro
The pitched video was made in After Effects with some plugins. It had to be replicated in Unreal Engine. It is composed of a shot of a drone powering up, hovering, breaking apart and rejoining into a 3D logo.
Basic animation on the drone was trivial. Splitting the mesh was not. After trying some shader-based approaches for per-island splitting to no avail, I separated each individual part of the drone. Then a niagara simulation takes over to throw each part around. Recombination is faked by applying a centripetal force.
As the parts move towards the center, they scale down. At the same time, the logo mesh scales up. With exaggerated motion blur, over a few quick frames it imitates the pitch to an acceptable extent.
The logo mesh was a bit less trivial. In After Effects, the transparent logo was turned into a solid mesh, with a metal look on all sides but the front.
The first approach used geometry script for the following algorithm:
- Tesselate a plane to an extremely high degree (vertices in order of ten-thousands).
- Apply the alpha of the user provided logo to displace the mesh. The alpha went through a binarization to ensure no sloping.
- Take a middle slice of the displaced mesh, by slicing off the top and the bottom.
- Faces facing Y-forwards are designated the front of the logo, and receive the color of the logo as emission shader.
- Faces facing Y-backwards are designated the back of the logo, they receive a material that does not appear in reflections.
- All other faces receive a tri-planar brushed material. The time taken by this approach depended on the complexity of the logo. A squicircle-esque logo was trivial to operate on, but the mighty dog logo took a solid 15 seconds to generate to an acceptable approach, hogging 7GBs of RAM during generation. Essentially, we were "rasterizing" the already raster format logo with the CPU.
This was well and good... until it came time to test it. Unreal does not allow geometry script in deployment. At the time the demo was recorded, I used a simple plane with emission shader for the logo. It worked well in deployment.
Later, I settled on a heuristic method by simulating a "point cloud" with niagara. I simulated a giant grid of niagara particles. Each point would render a sprite, take the color of the logo, transparent if it was blank. Then a grid search would reveal if a particle should take the brushed metallic look (i.e. edges and sideways corners). It was much faster than the geometry script approach, much better than the plane approach, with the downside that temporal anti-aliasing had to be disabled for the shot, making the reflections a bit muddy.
2. The flight
Using Cesium, we simulate a 3D terrain at those co-ordinates, using GIS data from Google and shoot a drone's trajectory over it. Not many wrinkles to it.
3. The outro (not included in demo)
Very similar to the intro. Just a simple bit from the client to add to the end of each video.
Controller
The controller is a separate CLI application that communicates with running binaries of the game over websockets. It reads the user requests and passes them on to idle binaries. Then it records the progress of the binary. In case of any errors, it can relaunch the binary. The error recovery depends on a sign of life system between the binary and the controller, where the binary must notify the controller about its status, or it is considered to have failed. When all parts of the video are done, it launches ffmpeg using a syscall to stitch together the videos and the sounds. Then it uploads them to the relevant s3 bucket, and pushes the link to the database.
Architecture and Deployment
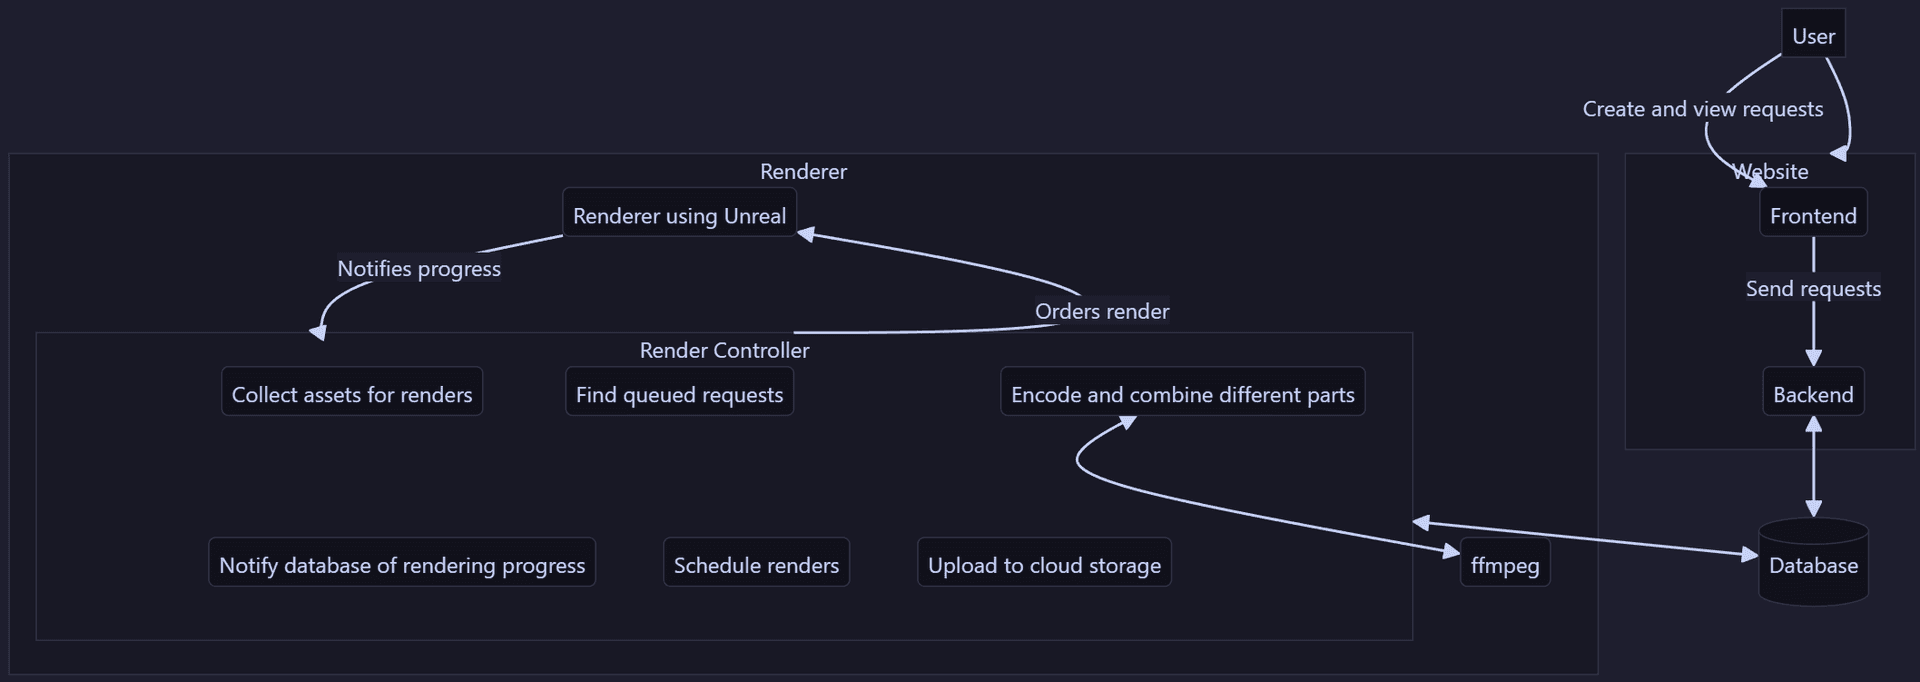
We took a multi-service approach to the problem.
A user-facing website independent from the rendering process, hosted on AWS like any web app.
Plus, a dedicated Renderer app consistent of submodules that lives on a beefier ec2 instance.
This renderer consists of a Controller (written in JS) that takes care of every part of the rendering step that isn't "producing pictures"; and a Renderer (written in Unreal) that does just one thing: Produce pictures as quickly as possible.
What I would do differently
1. Not use Unreal at all
It was not up to discussion as the client was dead-set on using Unreal, but I did float the idea of using a dedicated rendering software for the job. The game engine needs certain guarantees related to assets which limit the variety of operations it can perform. All the visuals in the game need to have computational invariance to some extent. For example, Unreal cannot currently generate geometry with Geometry Script in package. A dedicated rendering pipeline, consisting of a layout program such as Blender, and a renderer such as Blender or Nuke, would provide extra features giving us more creative freedom.
2. Build to scale from the start
The first few versions of the renderer were purely Unreal-based, as the requirements were simpler. This meant we were limited in communications with the renderer. After the first few demos, as stability came to be a priority, I made some scaffolding using Websockets for check and balance. But a lot of the assumptions from the initial days still stayed, and had to be taken care of one-by-one as they caused fringe cases. The time wasted could have been avoided with building to scale from the start, or to give refactoring a good go at it before adding new features.